
AreYouKidden
Legendary
Other Great Guides: Customized Gaming, Cooldown Conveyance, Nameplate Navigation
Greetings, and salutations! I am Avalon Alduin, Chancellor of the Academy of the Arcane Arts.
Today I bring to you, a guide on Customizing Your Gaming Experience on Outlands, through enhancing the screen you stare at while playing the game. Cleaning up the clutter, and organizing your adventure! This is in no way a complete guide, but some of the incredible discoveries I've made, that I hope will help you out. For those of you who prefer a video version - Pwnstarr Gaming was in attendance to the class, and took some great notes on most of the features! UO Classic Settings for the Perfect UI
If you've got a great interface you enjoy, share a picture of it below, for all the other students to fawn over!
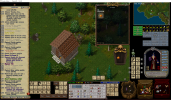
On the right with all kinds of options enabled, tree stumps, circle of transparency, aura's, name plates, health bars, and on the left, with most of this off, which is how I normally play, except I'll turn different things on/off when needed, like to see behind the house here. I'll walk you through many of the fabulous features you see here. Many of these options will be found by clicking Options on your paperdoll! (Alt-P by default! to get to the paperdoll)


We'll tackle many topics below including: (CTRL-F to search for one!)
Lets begin shall we?
The Menu Bar
This is a familiar bar, that many people like, and I list it here, because it is helpful in setting up the Interface, but some like to hide it. You can also hit the green arrow to collapse it, and only open it when needed. Access to the Maps and Gumps are very helpful here.

You can disable/enable it here in the options menu.

Paperdoll
Everyone likes to see themselves, and be able to play dress up! Did you know there is now an enhanced gear list, click the arrow at the bottom of the paperdoll to see it!
Also good to know - the QUESTS button will pull up the societies list, and the symbol of the virtues at the very top will open up your aspect menu.

World Map
Always have the world map up, so you can get around the world - it even contains what will come to be known as GPS co-ordinates in the top left, telling you where you are in the world.

By right clicking the map you'll find many options, including party options and healthbar options of party members so you can always locate them. Also you can use the Map Marker options to find many useful places around towns, and in the wild - especially useful are the Healer Caravans!

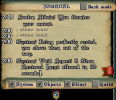
Journal
This is a great tool to always keep open, and you can now configure the multiple tabs along the top of your main window to view any information you want. You can also right click on any tab and detach it, turning it into multiple windows you can view at the same time. If you right click on the main journal below the headers, you can open up journal options to configure useful features like increasing the font size or brightness, or changing your journal to different colors or styles, you can even log your journal to file on exit.


Your Backpack
Your backpack, or your inventory is essential to any adventurer - double click it to open up and see the contents within the backpack. You'll notice one of my packs is colored, while others are not!

This is an option in the interface screen - Match Container Gump to Hue - my backpack is monster hunter red, while the backpack inside is not hue'd. Other useful menu items here are the different sized reagents & gems, and the new sails for those ship people, an always a favorite, the Container Scale & Scale Items inside the container!

Resize your Game Window
This one is self explanatory – make sure your game window isn’t locked, then use the blue diamond bottom right corner, to drag/resize your window to fit where you want it.

I generally recommend 1000 x 800 being the smallest, as it draws 18 tiles (which is what the server allows you to see for distance.

Anchored Gumps
Anchored gumps are anything like spell icons, macro buttons, health bars that can lock together and be interacted with, they form a cluster, which can’t be removed without pressing ALT, then can be positioned where you want on the screen.
Make sure your safety key (ALT) for closing and moving anchored gumps is on.

Drag spell icons out from your spell book, to create anchored clusters by touching them together.

When you hold ALT – you’ll now get a lock on them, you can click the lock to disconnect a button from the cluster, or if you right click while holding Alt – the entire block will disappear.

If you select the option below under combat spells - and hold ctrl-alt - you can click the + on a spell, quickly make a CUO macro, and hotkey it - so you can cast at the press of a button!


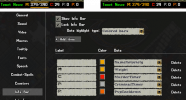
Grid Counters

These counters can be used by dragging an item into them, and it’ll keep count of them. You can enable the abbreviated amount where it'll show it as 2K+ like the leather above, or set highlights when items reach a certain quantity, or even scale the size to fit it into the perfect slot!
Grid counters are found here:

Infobar
This handy bar will show your name in your current notoriety (are you a gray thief or a red criminal?). I also like to use it to highlight a couple of information pieces like weight which has a colored visual as you get closer to max weight. There is also now a secondary info bar, so you can put useful information in a different location on your screen - I like to be able to see the mana I have left right under my character, so I can watch what's going on, and always know when I'm going to run out of spell power!


While I prefer to use the Large Status bar for most of the information this infobar can contain, there are dozens of options to look through.

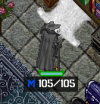
Status and Health Bars
Your Status bar can be found as a button on your paperdoll. Once open you can double click the small status bar to turn it to a large status bar, and can minimize the large status bar with the - in the bottom right corner to change it back to a small status bar.

Player health bars can be grabbed by clicking on a person and dragging away from them. Additional there are options so you can click & drag a box, to capture multiple healthbars at once, extremely useful for when you have multiple targets on the screen. The left side are the custom health bars, the right side are the original UO ones. I prefer the custom, because it'll highlight the last target you had selected in red - like Kael'm Randi below.

Healthbar options are found here:

Drag Select option are found here:
If you are using drag select on large quantities of mobs, it's always good to have Anchored Healthbars checked.

The Buff Bar
The buff bar contians a plethora of information on buffs like bless or barding area buffs, or debuffs like curse, or paralyze. These can be enabled by clicking the blue diamond beside Buffs on the large Status bar, and once opened can click the blue diamond on the buff bar, to turn it to the way you like.

Buffs have now been expanded with it's own complete menu in under Interface - Buff Icons with plenty of new great options!
See a full list of Buff Icons here: Wiki/Buff Bar

Grid Loot
While this isn't a visual on your interface all the time I felt this one was good enough to add in on this lesson. Grid loot lets you see all the mob loot, and single click it, to bring it to your backpack. On the left is the Outlands themed grid loot, on the right, the basic grid loot.

Grid Loot options are found here:

Codex, Chivalry, Necromancy Hotbars
These can be found in your various codex and books, but also can be called for with [chivalryhotbar, [necromancyhotbar, and [codexhotbar. The codex hotbar is a single bar, and you can flip through the codices to the one you are using - and choose your stances in this way. The Necromancy & Chivalry hotbars if you click the blue diamonds will configure in many different ways portrait or landscape, so you can configure it how you like to your screen.

WAIT! There's more - if you open your options menu, and hold CTRL-ALT-SHIFT a red pin will pop up on these bars - you can click the rune on the Necromancy or Chivalry bar, or the scroll on the Weapon & Shield codexes, and it'll pop up a gump to give it a name, and remember the last position by using the get current position. Additionally you can set them to remember across client restarts, so you'll never have to summon them forth again.

Apparently these new commands (with the dash) will work to quick save these bars, avoiding that nuisance listed above!
-savechivbar
-savenecrobar
-savecodexbar
Custom Macro Buttons!
With CUO you can create buttons that will trigger macros - ones you'd rather not hotkey because they aren't used often enough. Here were some of my favorites!
11546, 11548, 11549, 103

Go the the Macros menu in your options, create a new macro, and click on the Advanced Button Editor - type in your graphic number, scale it to what you want, generate your preview and then create it, so you can anchor it into one of your clusters somewhere! Below is a list of ones that are @Skuli approved! Additionally I've heard you can use UO Fiddler to see what other graphics you might like!


Miscellaneous General Options
I discussed some of these at the very start, so I thought I best include them! And one very useful tip to start it all off! Any menu option within Classic UO can be turned into a macro button in this fashion, like the Healthbar Line below!

Under Mobiles:
Healthbar Line

Auras

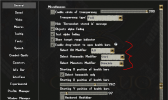
Under Miscellaneous:
Circle of Transparency

Show Target Range Indicator - this will show how many tiles from you when a target is up - currently 3 tiles

Under Terrain & Statics:
Hide Roof Tiles, Trees to Stumps & Hide Vegetation

Field Styles: Static, Tiles, or Regular Animated

Under Video:
Aura on mouse target - shows the aura of spell if it's hostile or beneficial on your target

Under Macros:
Nameplates - you can also hold ctrl-shift to pull up nameplates at anytime.

This concludes the lessons for today. There is a lot to take in, it is a good thing I've had a scribe record all my ramblings for you, so you can come back and refer to this at anytime you need to! If this was useful to you, give this a like below - and if you have ideas for future guides, send me a message on the forums or on Discord. Perhaps you'll become part of the next Academy lesson!
Yours Truly,
Avalon Alduin
Chancellor of the Arcane Academy
Pathfinder
Greetings, and salutations! I am Avalon Alduin, Chancellor of the Academy of the Arcane Arts.
Today I bring to you, a guide on Customizing Your Gaming Experience on Outlands, through enhancing the screen you stare at while playing the game. Cleaning up the clutter, and organizing your adventure! This is in no way a complete guide, but some of the incredible discoveries I've made, that I hope will help you out. For those of you who prefer a video version - Pwnstarr Gaming was in attendance to the class, and took some great notes on most of the features! UO Classic Settings for the Perfect UI
If you've got a great interface you enjoy, share a picture of it below, for all the other students to fawn over!
On the right with all kinds of options enabled, tree stumps, circle of transparency, aura's, name plates, health bars, and on the left, with most of this off, which is how I normally play, except I'll turn different things on/off when needed, like to see behind the house here. I'll walk you through many of the fabulous features you see here. Many of these options will be found by clicking Options on your paperdoll! (Alt-P by default! to get to the paperdoll)
We'll tackle many topics below including: (CTRL-F to search for one!)
The Menu Bar
Paperdoll
World Map
Journal
Your Backpack
Resize your Game Window
Anchored Gumps
Grid Counters
Infobar
Status Bar & Healthbars
Buffbar
Gridloot
Codex, Chivalry, Necromancy Hotbars and making them persist
Custom Macro Buttons and lots of options
Miscellaneous General Options – Aura, Nameplates, Trees to Stumps, Tile based Fields and more!
Lets begin shall we?
The Menu Bar
This is a familiar bar, that many people like, and I list it here, because it is helpful in setting up the Interface, but some like to hide it. You can also hit the green arrow to collapse it, and only open it when needed. Access to the Maps and Gumps are very helpful here.
You can disable/enable it here in the options menu.
Paperdoll
Everyone likes to see themselves, and be able to play dress up! Did you know there is now an enhanced gear list, click the arrow at the bottom of the paperdoll to see it!
Also good to know - the QUESTS button will pull up the societies list, and the symbol of the virtues at the very top will open up your aspect menu.
World Map
Always have the world map up, so you can get around the world - it even contains what will come to be known as GPS co-ordinates in the top left, telling you where you are in the world.
By right clicking the map you'll find many options, including party options and healthbar options of party members so you can always locate them. Also you can use the Map Marker options to find many useful places around towns, and in the wild - especially useful are the Healer Caravans!
Journal
This is a great tool to always keep open, and you can now configure the multiple tabs along the top of your main window to view any information you want. You can also right click on any tab and detach it, turning it into multiple windows you can view at the same time. If you right click on the main journal below the headers, you can open up journal options to configure useful features like increasing the font size or brightness, or changing your journal to different colors or styles, you can even log your journal to file on exit.
Your Backpack
Your backpack, or your inventory is essential to any adventurer - double click it to open up and see the contents within the backpack. You'll notice one of my packs is colored, while others are not!
This is an option in the interface screen - Match Container Gump to Hue - my backpack is monster hunter red, while the backpack inside is not hue'd. Other useful menu items here are the different sized reagents & gems, and the new sails for those ship people, an always a favorite, the Container Scale & Scale Items inside the container!
Resize your Game Window
This one is self explanatory – make sure your game window isn’t locked, then use the blue diamond bottom right corner, to drag/resize your window to fit where you want it.
I generally recommend 1000 x 800 being the smallest, as it draws 18 tiles (which is what the server allows you to see for distance.
Anchored Gumps
Anchored gumps are anything like spell icons, macro buttons, health bars that can lock together and be interacted with, they form a cluster, which can’t be removed without pressing ALT, then can be positioned where you want on the screen.
Make sure your safety key (ALT) for closing and moving anchored gumps is on.
Drag spell icons out from your spell book, to create anchored clusters by touching them together.
When you hold ALT – you’ll now get a lock on them, you can click the lock to disconnect a button from the cluster, or if you right click while holding Alt – the entire block will disappear.
If you select the option below under combat spells - and hold ctrl-alt - you can click the + on a spell, quickly make a CUO macro, and hotkey it - so you can cast at the press of a button!
Grid Counters
These counters can be used by dragging an item into them, and it’ll keep count of them. You can enable the abbreviated amount where it'll show it as 2K+ like the leather above, or set highlights when items reach a certain quantity, or even scale the size to fit it into the perfect slot!
Grid counters are found here:
Infobar
This handy bar will show your name in your current notoriety (are you a gray thief or a red criminal?). I also like to use it to highlight a couple of information pieces like weight which has a colored visual as you get closer to max weight. There is also now a secondary info bar, so you can put useful information in a different location on your screen - I like to be able to see the mana I have left right under my character, so I can watch what's going on, and always know when I'm going to run out of spell power!
While I prefer to use the Large Status bar for most of the information this infobar can contain, there are dozens of options to look through.
Status and Health Bars
Your Status bar can be found as a button on your paperdoll. Once open you can double click the small status bar to turn it to a large status bar, and can minimize the large status bar with the - in the bottom right corner to change it back to a small status bar.
Player health bars can be grabbed by clicking on a person and dragging away from them. Additional there are options so you can click & drag a box, to capture multiple healthbars at once, extremely useful for when you have multiple targets on the screen. The left side are the custom health bars, the right side are the original UO ones. I prefer the custom, because it'll highlight the last target you had selected in red - like Kael'm Randi below.
Healthbar options are found here:
Drag Select option are found here:
If you are using drag select on large quantities of mobs, it's always good to have Anchored Healthbars checked.
The Buff Bar
The buff bar contians a plethora of information on buffs like bless or barding area buffs, or debuffs like curse, or paralyze. These can be enabled by clicking the blue diamond beside Buffs on the large Status bar, and once opened can click the blue diamond on the buff bar, to turn it to the way you like.
Buffs have now been expanded with it's own complete menu in under Interface - Buff Icons with plenty of new great options!
See a full list of Buff Icons here: Wiki/Buff Bar
- Order Icons by Expiration Time Descending so buffs aren't jumping all over as they expire
- You can Display buff icons on the bottom and right, or only while hovering for various different health bars. Other will show monsters
- Show floating buff icons will float buffs on yourself or other objects as applied
- Show buff icon duration to put buff timers on your buffs
- Show buff icon values to show the effect value on the top
- Show expiration clock shadow to visually show when a buff is expiring
- And lastly you can adjust the buff sizes in the buff bar, with the Buff Bar Icon Size
Grid Loot
While this isn't a visual on your interface all the time I felt this one was good enough to add in on this lesson. Grid loot lets you see all the mob loot, and single click it, to bring it to your backpack. On the left is the Outlands themed grid loot, on the right, the basic grid loot.
Grid Loot options are found here:
Codex, Chivalry, Necromancy Hotbars
These can be found in your various codex and books, but also can be called for with [chivalryhotbar, [necromancyhotbar, and [codexhotbar. The codex hotbar is a single bar, and you can flip through the codices to the one you are using - and choose your stances in this way. The Necromancy & Chivalry hotbars if you click the blue diamonds will configure in many different ways portrait or landscape, so you can configure it how you like to your screen.
WAIT! There's more - if you open your options menu, and hold CTRL-ALT-SHIFT a red pin will pop up on these bars - you can click the rune on the Necromancy or Chivalry bar, or the scroll on the Weapon & Shield codexes, and it'll pop up a gump to give it a name, and remember the last position by using the get current position. Additionally you can set them to remember across client restarts, so you'll never have to summon them forth again.
Apparently these new commands (with the dash) will work to quick save these bars, avoiding that nuisance listed above!
-savechivbar
-savenecrobar
-savecodexbar
Custom Macro Buttons!
With CUO you can create buttons that will trigger macros - ones you'd rather not hotkey because they aren't used often enough. Here were some of my favorites!
11546, 11548, 11549, 103
Go the the Macros menu in your options, create a new macro, and click on the Advanced Button Editor - type in your graphic number, scale it to what you want, generate your preview and then create it, so you can anchor it into one of your clusters somewhere! Below is a list of ones that are @Skuli approved! Additionally I've heard you can use UO Fiddler to see what other graphics you might like!
Miscellaneous General Options
I discussed some of these at the very start, so I thought I best include them! And one very useful tip to start it all off! Any menu option within Classic UO can be turned into a macro button in this fashion, like the Healthbar Line below!
Under Mobiles:
Healthbar Line
Auras
Under Miscellaneous:
Circle of Transparency
Show Target Range Indicator - this will show how many tiles from you when a target is up - currently 3 tiles
Under Terrain & Statics:
Hide Roof Tiles, Trees to Stumps & Hide Vegetation
Field Styles: Static, Tiles, or Regular Animated
Under Video:
Aura on mouse target - shows the aura of spell if it's hostile or beneficial on your target
Under Macros:
Nameplates - you can also hold ctrl-shift to pull up nameplates at anytime.
This concludes the lessons for today. There is a lot to take in, it is a good thing I've had a scribe record all my ramblings for you, so you can come back and refer to this at anytime you need to! If this was useful to you, give this a like below - and if you have ideas for future guides, send me a message on the forums or on Discord. Perhaps you'll become part of the next Academy lesson!
Yours Truly,
Avalon Alduin
Chancellor of the Arcane Academy
Pathfinder
Attachments
-
 1654566577261.png41.3 KB · Views: 13,709
 -
 1654565779358.png298.1 KB · Views: 6,374
 -
 1654563173353.png2.6 MB · Views: 9,414
 -
 1654564223590.png58.3 KB · Views: 7,036
 -
 1654565218894.png660.7 KB · Views: 6,403
 -
 1654565446041.png536.4 KB · Views: 1,332
 -
 1690580574023.png2.1 MB · Views: 2,033
 -
 1690580657822.png37.1 KB · Views: 10,829
 -
 1690581262109.png20.4 KB · Views: 1,170
 -
 1734360806133.png415.7 KB · Views: 400
Last edited:
