What's new

Notes/Findings/Random Thoughts

Special Fishing Nets

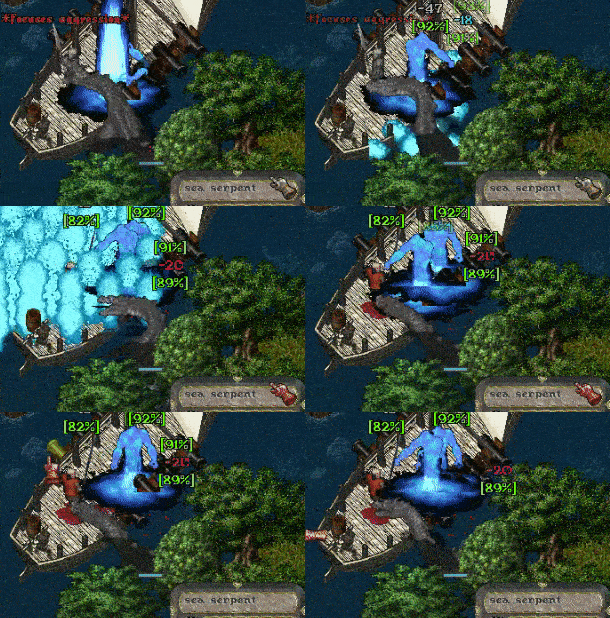
Sea Serpent.gif


I just ran a quick test of Special Fishing Nets to see what kind of beasts were summoned, and what to expect for loot.

Special Fishing Nets (not to be confused with Player-Crafted Nets) are the ones a fisherman can find while fishing (and sometimes as loot on sea monsters) that can be thrown into any body of water while you are on a boat, and it will generate an event (usually a spawn of a single creature that you can fight).

I threw 5 nets in total; here are my results:

Monsters:
1 Sea Serpent
1 Sea Hag
1 Raging Tide
2 Water Spirits

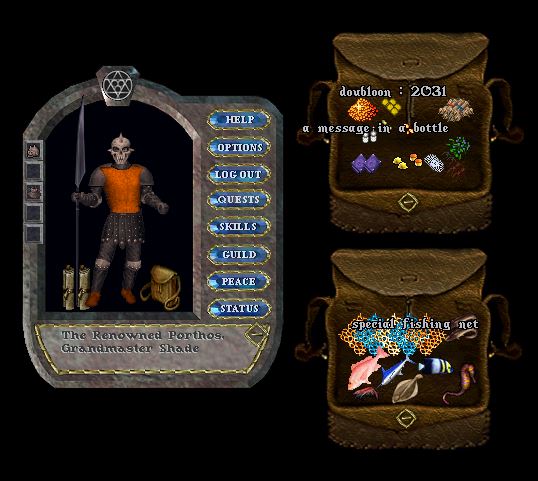
Loot:
2 Message in a Bottles
2,031 Doubloons
2,231 Gold
6 Gems (various)
11 Spell Scrolls (various)
155 Reagents (various)
2 Magic Spellbooks (Simple Eminently Charged Ruin, Substantial Surpassingly Charged Ruin

Special Fishing Net Loot.JPG


On UO Outlands, Fishing can be an exciting and lucrative sport! So dip some lines in the water and enjoy! :)
 
SoS Coordinates and Ultima Mapper

Someone had asked if SoS coordinates could be manually added to Ultima Mapper (my mapping program of choice), and the answer is yes!

When you open a Message in a Bottle (MiB), which is found as loot on sea beasts, the resulting SoS Message contains coordinates. Plug those coordinates into Ultima Mapper and away you go! Enjoy! :D

SoSMarker.JPG
 
Beginning Character: Fisherman

As promised, I ran a new Fisherman for 8 hours and want to share my results!

I started the character with 50 fishing and 4 vendor-bought poles. I also started fishing from a small boat from the very beginning and throughout the entire test. Reasoning behind this: fishing from a boat is the only way to fish up Special Nets and Rare Deco Fish. Also, I don't plan on starting out with a Fisherman on day-1, I will do so once I level up a Carpenter and can provide my Fisherman with a small boat. One could start fishing from shore for the same skill gains, but without the opportunity to fish up rares. On a previous test, it took roughly 80 hours to GM Fishing, so you will be slapping the water with a pole for a long time, and I want to make every cast count.

At 29 minutes into the test, and at Skill 51.2, I was elated to pull up my first Rare, a Special Fishing Net. I had no idea it would be a couple of hours later before I saw my next Rare, but such is the life of a fisherman; you get what you get! (*insert sad violin here) :p

All told, here's the Loot!:
3 Special Fishing Nets (Use on open water to summon at least one sea creature, which will yield a variety of treasure)
4 Rare Deco Fish (for fish tanks and decoration)
1,417 Raw Fish (minor cooking ingredient)
14 Raw Large Fish (rare cooking ingredient)
14 Raw Crab (rare cooking ingredient)
10 Raw Lobster (rare cooking ingredient)

** One item to note concerning the boat I was fishing from. As you may or may not know, not all boats are created equal. When built, they all have a plethora of "Base" stats, all of which are modified slightly based on RNG and the skill of the crafter. In the case of my particular boat, I was blessed with +4.6% Fishing Special, meaning I had a slightly increased chance for pulling up rare fishing items. Make sure you are aware of this little factoid when purchasing or crafting your own boat; check out the stats! Because it could just as easily have been MINUS 4.6%! Most importantly, enjoy what you do! :D

beginner fisherman.JPG
 
Player-Crafted Nets

The other type of functioning fishing net you will encounter (aside from the Special Fishing Nets) are Player-Crafted Nets. These nets can be crafted via the Tailoring Skill out of all types of leather (the more rare the leather, the better durability and special chance the net has). As of this writing, it is unknown what the individual skill requirements will be. These nets can be used in "Special Fishing" places, like these following examples which can be found out at sea.

boatwreck.JPG

raft.JPG

Sunken Tree.JPG

two.JPG

whalebones.JPG


To use the fishing net, you can double-click the net, then target the special fishing area; or you can just double-click the fishing area and it will throw the net automatically (if you have one).

fishingnet.gif


After you launch the net, a variety of things can happen. You can get nothing, you can get rare cooking ingredients (crabs, lobsters, large fish), you can get deco items (like fish for your fish tank), or like the example above, you can attract the attention of a sea monster!

And before you get too comfortable, sea monsters don't always stay in the water where you can run away from them if you get into trouble... sometimes they spawn on the deck of your ship!
drowneddragon.gif


The test I conducted was with Copperhide Fishing Nets, which is on the lower-end of special leather; easy enough to find and still give me a small bonus to finding special items. My boat also has a couple of fishing benefits built into it, granting me a 55% improvement on my chance for special items. I tested 10 different Special Fishing spots, exhausting each one. With that said, here are my results:

fishingnetloot.JPG


Net-Casting Results:
Nothing: 43
Large Fish: 22
Crab: 12
Lobster: 10
Rare Deco Fish: 1
Sea Serpents: 4
Deep Crawlers: 1
Raging Tides: 1
Water Spirits: 1
Drowned Dragons: 1
Husk Crabs: 4

Loot from Monsters:
2850 Gold
2857 Doubloons
10 Gems (various)
1 Cleverly Drawn Treasure Map
1 Substantial Jongleur Tamborine
1 Defense Studded Bustier
110 Reagents (various)
9 Spell Scrolls (various)

All told, finding and looting Special Fishing spots is rather enjoyable (at least for me). You have chances for special items and unique monster encounters you can only find at sea. Good luck, have fun, and always watch your back; there be pirates about!
 
Messages in Bottles: SoS Fishing

In the final fish net installment (for now, lol), I wanted to address the fishing-up of SoS scrolls, which are retrieved from Message in a Bottles (MiBs). You use the same nets you used for Special Fishing spots, those being Player-Crafted nets.

In my testing, I used Player-Crafted Copperhide Fishing Nets. My boat is also outfitted with a couple of items that increase the special fishing chance by +55%, so that might factor in somewhat.

Once you fish up a MiB, you double-click it to get the SoS scroll, which will list coordinates on where to find this unique fishing spot. I fished up 2 MiBs during an earlier test, so I went out and found their locations and fished them up! While the sea monsters I encountered while fishing up the SoS weren't really any "tougher" than the ones from the Special Fishing Spots, they often spawned in greater numbers and were nearly overwhelming a couple of times.

spray2.JPG


Also, in the course of fishing up the two MiBs, my crew of 3 Master Crewmen were dead by the end of it, which should tell you something about the kind of damage you could be facing from the monsters.

One unique item is guaranteed for every SoS, at least one Salvaged Crate, which contains the majority of loot for the SoS. You are guaranteed at least one of these crates, but you may be lucky enough to pull up to 3 max. Also, there are three different sizes. As luck would have it, I pulled up a Medium Salvaged Crate on the first SoS, and BOTH a Large and Small Salvage Crate on the second SoS! They will look great in my house after Launch! Oh... wait... :p

waterspirit2.JPG


Anyway, without further ado, here are the specifics:

SoS #1:

sos1loot.JPG


Net-Casting Results:
Nothing: 6
Large Fish: 4
Lobster: 6
Rare Deco Fish: 1
Water Spirit: 2

Loot From Monsters:
1153 Gold
1246 Doubloons
1 Guarding Wooden Shield
1 Surpassingly Charged Might Spellbook
1 Fortification Rune
100 Reagents (various)
6 Spell Scrolls (various)
1 Medium Salvaged Crate

Loot from Crate:
2130 Gold
175 Arrows
175 Bandages
1 Eminently Accurate Ruin Heavy X-Bow
1 Force Spellbook
1 Simple Power Spellbook
1 Durable Hardening Ringmail Chest
1 Fortified Hardening Chainmail Skirt
1 Expert Navigator Crewmember Contract
1 Expert Orc Reaver Crewmember Contract

SoS #2:

sos2loot.JPG


Net-Casting Results:
Nothing: 11
Large Fish: 4
Raw Crab: 1
Rare Deco Fish: 1
Sea Serpent: 2
Ocean Spray: 8

Loot From Monsters:
681 Gold
694 Doubloons
16 Reagents (various)
8 Spell Scrolls (various)
1 Small Salvaged Crate
1 Large Salvaged Crate

Loot from Crate #1:
2823 Gold
200 Arrows
200 Bandages
200 Ginseng
2 Tourmaline Gems
1 Agility Potion
1 Charged Force Spellbook
1 Hardening Chainmail Gorget
1 Hardening Leather Arms
1 Substantial Hardening Studded Leggings
1 Hardening Heater Shield
1 Durable Accurate Force Pitchfork
1 Expert Marksman Crewmember Contract
1 Expert Sea Dog Crewmember Contract

Loot from Crate #2:
1652 Gold
150 Bolts
8 Spell Scrolls (various)
1 Massive Hardening Bronze Shield
1 Force War Mace
1 Hardening Leather Gloves
1 Expert Carpenter Crewmember Contract
1 Expert Gunner Crewmember Contract

And that, my friends, is what I call a rather lucrative investment: absolutely worth the 80 hours it takes to GM Fishing! Good luck and have fun! :)
 
Special Fishing Nets: Larger Sample

From the Patch Notes:

Special Fishing Nets

  • Players have a (0.5% * (Fishing Skill / 100) * (100% + Fishing Pole Bonus) * (100% + Ship Upgrades Bonuses)) chance to find a Special Fishing Net while fishing on land or while on a ship
  • Special Fishing Nets are single use items that may be thrown from a ship into the water
  • Once thrown, a Special Fishing Net has a 75% chance to generate a Fishing Creature Spawn or a 25% chance for the player to catch a Special Fish
  • If a Fishing Creature Spawn occurs, there is a 25% chance that one creature will have a Message in a Bottle on it's corpse
  • Special Fishing Nets are stackable by color (colors are randomized)

specialnet.PNG


Took a few minutes to cast some more Special Fishing Nets (the ones you can just throw on the water from your boat, no Special Fishing Spot needed). This time around, I cast 20 nets, here are the results:

Mobs:
Ocean Spray: 5
Drowned Dead: 2
Overseer: 1
Observer: 3
Sea Serpent: 4
Tidal Mantis: 2
Trilobite: 1
Raging Tide: 1
Water Elemental: 2
Drowned Dragon: 1

Notable Loot:
Gold: 2883
Doubloons: 2894
Magic Spellbooks: 3 (Simple Charged, Substantial Surpassingly Charged Ruin, Substantial Surpassingly Charged)
Message in Bottles: 3

"Failures":
This list is where I cast a net, but received less-than-desirable results. I consider each of these a "wasted net" :(
Large Raw Fish: 1
Crab: 3
Lobster: 3
Nothing: 1 (will report as a bug)

Final Thoughts:
So, out of 20 nets, 8 were "failures." I find this rather disappointing, as Special Fishing Nets are a rare item themselves. I feel they should have a better percentage chance to pull a monster. According to the Patch Notes, the ratio should have been 75% Monsters/25% Special Fish. Mine was 60% Monsters/40% Special Fish (if you consider crabs and lobsters cooking ingredients "Special Fish.") I will just jot this down as Bad RNG.
 
Societies! Good Evening Outlanders!

It's been a busy summer, so I haven't posted in a while, but I will be grinding back onto the scene with a little note on Societies (link to Patch Update). I had a character on all three of my accounts max out their Society jobs so I could test out the process and rewards. Up front, most of these jobs are NOT easy, and certainly NOT cheap! Everything I did was on the crafting side, and most of the tasks required special materials that will be scarce enough, and certainly not so abundant to waste on 60 Exceptional Rosehide Gorgets! That said, the rewards are pretty cool and unique, and is something I will find worth my time (I'm kind of a sucker for pixels and interesting spell effects. So anyway, here is what I did, and what I found! The mysterious @NocturnalLlama joined me to bear witness and exchange notes, welcome! :D

First off, you can find the Society Leadership in their Prevalia Headquarters, NE of the main bank. Just sidle up to the Society you're interested in and say "job" or "jobs" or a couple other words mentioned in the Patch Update, and a gump will open up with the available jobs. Choose the ones you like and you're on your way! Jobs update weekly, and you can have up to 10 jobs active at a time.

K3Gpbkm.png


Once you complete a job, you will receive an Achievement notification and a certain amount of Reward Points, which can later be used to purchase unique enhancements for your account, like Deeds, Dyes, Spell Hues, and more!

vzlg4Ud.png


Having completed 29 of the 30 jobs (one job couldn't be completed due to a problem with crafting Exceptional Tomes), I could only afford a few of the enhancements. The "better" ones are much more expensive, and will take a lot longer to get. I will update this thread as I progress! Since I had three accounts going, I had to choose three different Societies. I chose the "crafting" ones as they were the easiest to complete with the unlimited resources provided to us in town. My Societies of choice were Tradesmen (Carpentry/Tinkering), Armorers (Tailor/Smith) and Artificer (Scribe/Alchemy).

WuU5k8H.png


The "prizes" I chose above were some dyes for runebooks, furniture, and shield, as well as a spell hue deed and a single piece of cloth. Since the cloth only comes in a single piece, I will stick with that Society until I get enough cloth to make something. Definitely something to consider, so if you prefer a certain cloth color over another, choose that Society for your jobs.

One note about the Spell Hue Deed. When you activate it, a RANDOM spell will get chosen. After activating the deed, you need to make the adjustment through your paperdoll/help/enhancements/spell hues before it takes effect. (Sorry for the crappy gif... the flickering at the end is me paging through the spells to get to the one that has the effect.)

process.gif


Shield Dye was next:

shield.gif


Then Furniture Dye:

furn.gif


And finally Runebook Dye:

rune.gif


These were the first (and cheapest) items available through Societies, but they get better! Up to and including a Mount Token that you can carry in your backpack and activate by double-clicking it (and I believe your mount will return to your backpack whenever you enter a no-mount zone...) I'm sure there is something in the patch notes about that! ;)

Anyway, a quick and dirty synopsis of my Societies experience so far. I will update again when I get more points! Thanks for checking it out, take care!
 
Last edited:
Corrupted Shrine Loot!

Just finished cleaning up a Corrupted Shrine with Krayer (not sure if he's in here), and it was a pretty big job; took hours with just the two of us. I soloed for a long while, dying often and trying different builds. I finally settled with a Stealth Archer, mainly so it would be easier to loot my body; which was important because @Owyn had upgraded my clothing with some sweet Inferno hue! On about my 10th death, I noticed it was still in my backpack... turns out he had BLESSED it! Thanks so much for having pity on me! :D

Anyway, while I did loot many of the mobs from the several waves, what I want to highlight here is simply my share of the event as received by Ank Tokens. These tokens are like prize tickets; double-click them to get the "prize." I received 35 tokens for my trouble, and here is what the end-result was:

Capture.PNG


Capture2.PNG


shrine loot.PNG


If you'd like to learn more about the Corrupted Shrine Mini Events, read up here: Corrupted Shrine Patch

Onward! :D
 
Grinding a Shipwright!

I thought I'd test a "realistic" time frame to grind out a new shipwright from scratch, to see how long it would take before I could build a ship. This is my initial installment, and will update with progress as I go. Having hit a sort of "milestone," I will start here. :)

The goal here is to reach 85 Skill in Carpentry as quickly as feasibly possible with a solo character, as that is the minimum skill needed to craft a Small Ship.

My character began with the following skills:
Carpentry: 50 points
Lumberjack: 49 points
Mining: 1 point
Mining: +49 points purchased with new-player ticket
Camping: +50 points purchased with new-player ticket.

I placed a point into mining for a couple of reasons. It allowed me to start with 2 pickaxes in addition to my other gear, and awarded me with a +10 Strength stone. The other reason is that I will be mining for ore/smelting ingots later down the road because building a ship requires wood, ingots, cloth, and a mastercrafting diagram (dropped as loot and found in chests).

My beginning gear was:
Mace
Axe
Hatchet (x4)
Pickaxe (x2)
Saw (x3)
Strength Stones (x3) granted by choosing Carpentry, Lumberjacking, and Mining as starting skills.

After applying the stones, my starting strength was 90, with Dex and Int both at 10. I figured carry weight would be important, which is why I boosted strength, and included 50 camping (which adds 100 more stones carry weight).

Milestones:

First Milestone: Skill 65 Lumberjack
At this point, I can start pulling Dullwood. This can be a blessing and a curse. I prefer to put my special woods to the side until I am of a great enough skill to craft something decent from it, but doing so dilutes my available resources (this could be wood I could fashion into something now for skill gain). You will have to decide at this point which way you will go with that. Up to this point I was crafting and recycling Clubs. It is here I will switch to something more difficult, Tambourines.

65 lumberjack.PNG


Second Milestone: Skill 68 Carpentry
This is the half-way point, between Skills 50 and 85. From here on out, gains should steadily decline (as they become less over time as you skill rises).

68 Carp.PNG


Thus far, I have gathered 27.5k logs, and have used 31.5k boards. I've "used" more boards because I recycled nearly everything I made, and the re-used boards add to the count.

wood gathered.PNG


boards used.PNG


I say "nearly" everything I've made because some of the things I made I needed to sell so I could get more saws and hatchets; something I've had to do several times now over the course of this experiment.

As a final note on this installment, times and success will vary. A person could generate a carpenter more quickly if they were being fed boards from other accounts, or from guildmates. I want to emphasize that this is a test of how successful a solo could be, and how much time it might take. I didn't pause to make items, I made them as I continued lumberjacking, which I believe saved some time (it takes several minutes to whittle down 1k boards). Hopefully this information will be helpful in planning your own carpentry efforts, and will give you a better idea how long it will take to get a ship on the water! :D
 
Grinding a Shipwright (Part 2)!

Quick, simple update:

Just hit Carpentry Skill 75 (Benchmark #3). At 75, I no longer receive gains by crafting tambourines, so I now move to Cushioned Chair. You may read elsewhere that Bamboo Flutes are the next step in the Carpentry process, but I've found that you lose a LOT more wood going that route (80% success making chairs vs 0.2% success making flutes). With the recycle feature here on Outlands, it just makes sense to regain as much wood as possible. No matter what the success percentage is, as long as there is a chance to gain, you will gain, so why not make things that have a good chance of success? Anyway, to each their own! ;) 10 more skill points to go until I can craft boats! :)

Capture.PNG
 
Last edited:
Wow this is great stuff. I can't wait to get out on the waters and sink my boat!
Finally late game fishing is profitable but with equal risk!
 
Lockpickers Rejoice!

After 20+ hours of Lumberjacking, I thought I'd take a break (who wouldn't?) and use this opportunity to test out a new Lockpicking tool @Luthius introduced a couple of patches ago; "the locksmith training box."

I plan on getting pretty basic in this one, as some folks checking in might not be that familiar with how things might work here, starting with...

Character Creation
I started out with 50 Lockpicking, 49 Tinkering, and 1 Mace Fighting. "Remove Traps" is not an option when creating your character, so to balance this, you receive two Remove Trap tools. Lockpicking got me two SETS of lockpicks (100 picks per set), and Macing earned me two pickaxes. As I created my character, my thought process was that I would be able to farm the materials I needed for the training box (wood and iron), and with my tinkering skill, make the box myself (** NOTE, you can also purchase the box for 75 gold from NPC Tinkers, Thiefs, and Provisioners). Oh my God, I'm monologueing... let's go.

LP Start.PNG


Straight away, I found Carlos the Thief (under the Inn) and Ancelin the Healer (near the New Player Dungeon) so I could train 50 points each into Remove Trap and Healing (when you're new, something is usually trying to chew on you while you pick dungeon chests.) Training up was simply a matter of selecting the skill I wished training on, then dropping my new-player ticket on them (worth 1000 training credits (100 skill points)).

Carlos the Thief.PNG
LP healer.PNG


My skills after training up:

after certificate.PNG


There are many (countless?) ways of generating a lockpicker, this is just the route I took. The minimum Tinkering skill required to make the training box is 50, which leaves me one point shy. Good thing is that each skill point only costs 10 gold to train, which should be easy enough to get.

After fighting off some mongbats, my first chest looks like this: (Note, I believe ALL chests in the New-Player Dungeon are this level, which means you won't gain any skill if you are 50 or above in Lockpicking and Remove Trap. But we know this, we are just after what's inside, for good reason as you will soon see!

first chest.PNG


The idea with Outlands Lockpicking is that you should Remove the Trap before you attempt to Pick the Lock, because Luthius has hidden some very nasty (and sometimes humorous) traps for you. As long as you have the tools on you, all you have to do is click the jewel. If you have "special" tools (made from special materials), you need to select them in the scrolling menus on the left). Picking through these chests is a pretty simple matter if you are level 50, so onward!

And... HERE is why you rolled a lockpicker. Chest is open, as is one of the mongbats I killed. The two chests in the first room of this dungeon have the same amount of gold as 26 mongbats! Plus, we found trap wire, which can be used with our Tinkering skill to make box and floor traps.

chest open.PNG


As you can see, I'm taking damage while I'm opening this chest. Fighting doesn't interrupt your lockpicking, AND if you have the skill, you can hide (and remain hidden) while you pick the lock. Bonus! :D On that note, let me point out a little something many might not know: your Bandage Timer! The higher your Dexterity, the more quickly you can apply a bandage. Here you see I have 12 seconds remaining before I can apply another bandage. If I try to apply another bandage before then, it will stop the current bandage attempt and reset the timer (hate it when that happens...).

timer.PNG


With a pocket full of gold (which only took a couple of minutes), I ran directly to the Tinker to get my final training point. For now, the Tinker is located in the same building as the Tailor, Gem Dealer, and Provisioner, by the Mine entrance. Rumor has it he will be moving soon, but not far. ;)

tinker training.PNG


So, now that we're Skill 50, let's take a look at our prize! Holy $h*t, is that a 0.2 chance of success? Yep, as is often the case with minimal skill, the starting success is this low. What that means to us right now... well... since I would be failing a lot, and since I don't have money to train up a Miner (for the ingots) and a Lumberjack (for the wood), I recommend (for time's sake), you roll up a character with 50 in each of those disciplines and give your Lockpicker the resources they need. Sure, you can solo train up until you have the resources, but... ya. Go for it! :p

training box.PNG


I opted for the latter, and at 50 Skill in Mining and Lumberjack, gave the resources needed to my guy. Final tally before I was able to craft the box was 270 boards and 135 ingots. (ouch). But now I have the box, and it works! Double-clicking on the box opens the Remove Trap/Pick Lock dialogue. After picking the dungeon chests, I have 196 of each tool left.

picker box 2.PNG


After using up all 196 of each tool, I gained 0.1 in each skill... While that may seem low, at least I'm able to train this in a safe place rather than in a dark, damp dungeon with slimy PKs lurking around every corner... *shudders. :p

lp progress.PNG


So, in the interest of SCIENCE, I pulled 1k more lockpicks from the shelf in town, set a macro, and recorded the results. After close to an hour (probably a little more), and 1000 lockpicks later (10 sets of lockpicks), I had gained an additional FULL POINT. One very important thing to note about the Training Box. Yes, you can set off the trap, but NO, it does not hurt you. So go for it!

lp skill gain.PNG


Parting thoughts:

Skill gain will seem relatively slow, and lockpicks/trap tools are NOT cheap or easy to make... however... this tool is a Godsend (at least from where I'm standing.) It allows one the ability to train a very difficult skill, in the safety of your home or in town, while you are off adventuring on another account (if you're into that). Not long ago, the only way to gain was by visiting very dangerous places we lockpickers are ill-equipped to adventure in, so thank you for this wonderful gift! Now get out there and loot stuff! :D
 
Last edited:
Pit Dragon Mini-Boss Solo with Scribe/Summoner!

In the interest of trying out a couple of new mechanics, I patched together a build I thought would be interesting; essentially a Scribe Summoner with a twist.

Pit Dragon Solo.PNG


The two strange things about this build are Parrying and Tailoring; let me explain. :)

Parrying:
At 80 Magery and 80 Parrying, a mage can cast spells while their shield is still equipped (and since I'm using a buckler, I don't suffer any Meditation penalties). This is good for a couple of reasons: you get to enjoy the benefits of the extra Armor Rating (at 100 Skill, I get +50% to my shield's natural AR), and at 100 Skill like you see here, you have a 50% chance to parry a melee attack (reducing it to 25% damage), and a 25% chance to parry spells (also reducing them to 25% damage). Both great physical bonuses in case something get's close enough to hit me, or something decides to cast spells at me.

Tailoring:
At Skill 100, my Leather Armor gets a 25% boost to it's natural Armor Rating. Also, if I get hit with melee, I send 50% of the damage back onto the attacker. Again, just a little bit more of physical protection in case my summons fall and I need to continue the fight on my own.

Short explanation of the "Typical" skills you see here:

Evaluating Intelligence:
At 100 Skill, I do an additional 50% spell damage.

Inscription:
At 120 skill, I am granted the following:
+48% chance to not burn a level 1-6 scroll you are casting from (i.e. E-bolt)
+96% chance to not burn a level 7-8 scroll you are casting from (i.e. Flamestrike)
+30% increased damage if casting from scrolls
+30% chance to refund any mana spent while casting from a scroll
At least 24% chance your Magic Reflect stays in place (when hit with a Circle 8 Spell), chance of keeping your Reflect is much better the lower the circle cast against you.
Max damage protection from Reactive Armor increased 48 points.
Protection Spell duration increased 600%
Bless Spell duration increased 600%
Invisibility Spell duration increased 600%
Arch Protection Spell duration increased 600%

Magery:
Casting from scroll increases Magery +20 (I'm not sure how this played into the effectiveness of spell damage though, if at all)...
Spells have a 10% chance to be "Charged," which adds an additional 50% to damage

Meditation:
Just lets you gain mana back quicker :)

Spirit Speak:
Summons:
Without any Summoning Stone charges, grants a 10% increase in summoned creatures stats and skills.
With Summoning Stone charges, can "upgrade" your summons on two levels.
Elder: +15% increase in stats/skills, +15% Dispel resistance, 300 seconds summon duration (vs normal 150 seconds)
Ancient: +30% increase in stats/skills, +30% Dispel resistance, 600 seconds summon duration.
Spells:
If spells become charged (see above), there is a chance to add Spirit Energy to the spell, increasing the Charged damage by another 50%

Okay, on with the adventure! :D

This image demonstrates how high your Flamestrike damage could be, when charged and filled with Spirit Energy: 428 damage (poor chameleon...)

flamestrike.PNG
FS cameleon.gif


Final loot tally:

Pit Dragon Loot Run.PNG

loot book.PNG


Moving gold I couldn't carry (some of you may not know that you can hold the gold (or whatever heavy object) on your cursor while you hit your gate macro, and presto, it gates with you!)

carry gold.gif


And last but not least, my favorite loot item of the day: a Spell Hue Deed! I was lucky with this one (they are random), and got a Nusero Spell Hue for my Daemons! :D

nusero daemon.gif


Final, parting thoughts:

A Scribe/Summoner Mage is hugely powerful and great fun to play, but you will spend a lot of gold and time getting them there! I would NOT add Tailoring to this build, but really do like Parry, so I will probably pick up a weapon skill (most likely mace fighting), so I can help my summons kill things while my mana recharges. Anyway, I had a lot of fun with this run, hope some of this info helps! See you out there! :D
 
Grinding A Shipwright (Final Part 3)!

Some of you may have thought I'd forgotten all about this! Well... you'd be wrong! :P I finally achieved Skill 85 in Carpentry, currently the entry-level skill for making ships. Again, I remind you, this is a solo effort; my carpenter logged his own lumber and wasn't given any lumber from anyone else. So, if you are able to have someone feed your carpenter lumber, you will most likely achieve this Skill level more quickly.

Anyway... 35 hours later! o_O

85 Carp.PNG


As a "bonus" to all of this time spent Lumberjacking, I have a bag FULL of exotic wood, and now have the Carpentry skill to make good things with it. Good things I can use or sell to others!

Dullwood: 1657
Shadowwood: 1121
Copperwood: 797
Bronzewood: 519
Goldwood: 173
wood.PNG


Now, let's make our ship. Here is the short version, no fuss. One of the main advantages (in my opinion) of a small boat is that it costs Zero doubloons to launch, so is the obvious choice as a first boat for everybody, since pretty much the only way to get doubloons is by doing things on a boat!

Besides your shiny new 85 Skill points, you will need:

1 Mastercrafting Diagram (loot drop)
1500 Boards
150 Iron Ingots
150 Cloth

make ship.gif


All ships must be "Registered" before they can be placed in the water. Since our registration is free, we can do it right now!

register ship.gif


One VERY important detail that I've mentioned before in my other "Ship" entries in this Forum post is STATS! Most of the folks planning on using a boat will be buying one rather than making one. Before you buy, check the STATS! Ship stats always have a "range" when they are built, and the higher the Skill level of the builder, the more likely these will be POSITIVE stats. The earliest boats in the game will be made by Carpenters who BARELY have enough skill, so there will definitely be negative stats, and you want to make sure those negative stats are in areas you can live with. Fair warning! :D

In our case, we have NEGATIVE stats in:
- Cannon Reload Time (takes longer to reload your cannons)
- Repair Cooldown (takes longer between repair attempts)
- Doubloons Earned Bonus (earn less doubloons)
- Fishing Special Chance (less chance to fish up a special items)

On the flipside, we have some pretty significant POSITIVE stats:
+9.3% Greater Ability Cooldown (you can use your greater abilities more often)
+8% Crew Health Bonus (crew has more health)
+9.3% Sails Repair Amount (repairs to your sails are boosted)
+7.7% Hull Repair Amount (repairs to your hull are boosted)

While personally I'm not happy with the negatives (they are actually pretty minor % negatives), the added bonus to repair amounts is great, as is crew health. Our first ship turned out pretty good!

ship stats.PNG


The final thing to do is set her down in the water, somewhere safely away from the watchful eye of @Dewderonomy (if that's even possible). :P

ship launch.gif


I wish you all the best in your ship-building and sea-faring adventures! See you all back in The Outlands! :D
 
I meant to add stats on how many logs I lumbered, and how many boards I used. Some boards were used to finance my journey (had to purchase saws and hatchets as they wore out). 96,469 Logs harvested, 130,346 Boards used (many of the items I crafted were recycled, and the boards re-used... you get back 50% of the boards when recycled).

Logs Harvested

logs.PNG


Boards Used

boards.PNG
 
Treasure Maps!

I finally got around to testing out T-Maps here on Outlands, and found it to be a very cool system! Other's have posted info on their exploits, here's mine! :D

You need the Cartography Skill and a Spyglass to decipher maps. How good your skill, and the quality of the Spyglass, determine how accurate your map will be. The more accurate the map, the closer the pin will be to the actual dig area.

I deciphered this map with Cartography Skill of 70%, and an Agapite Spyglass. This gave me an accuracy of 72.6% (while deciphering, I did gain 0.2 skill in Cartography! :D )

My final, deciphered map looked like this:

general area.PNG


My treasure hunter has a Mining Skill of 100 (mining makes your search area larger, so you can detect the hidden treasure from a greater distance away). This is especially helpful when your map isn't very accurate).

The actual treasure location. I was able to dig it up quite a few tiles away from where I was standing :) I did have to run around a little bit before I was successful. You are hindered while you dig (which means you pretty much can't do ANYTHING except dig). It was an uneasy feeling and seemed to last longer than expected, but in my case, the first wave of spawns popped up a couple of seconds after I was "finished" digging, so I had just enough time to successfully hide (or run away, whichever the case called for).

actual destination.PNG


There will be an initial wave of mobs (based on 20 "monster groups"). My first spawn was very... Terathan-centric. There was also an unfriendly Druid in the mix; as you can see we are right in the middle of his camp.

first wave.PNG


Before even touching the chest, I wanted to time the second wave. More waves will happen every 15-60 minutes, depending on the difficulty of the chest. Depending on your Remove Trap and Lockpicking skills, it could take a while. Or... you could just stand around like I did and wait for them! :)

Second spawn occurred 32.5 minutes after the first, and was more "fire-based" it seems:

second spawn 32 min.PNG


I do need to note here that you can't stand around all day doing this; these Chests DO have a decay timer!

tchest decay.PNG


Chest upon opening:

tchest loot.PNG


Final Loot Tally (spawns plus chest):

lootbook full.PNG


And, that's about all there is to it! With hundreds of unique treasure chest locations around the world, I REALLY look forward to digging them up! Until next time, have fun adventuring Outlands!

tmap complete.PNG
 
Resource Maps! A Treasure of a different sort!

In the never-ending line of content Outlands has to offer, one of my favorites (as a gatherer and crafter) is the addition of Resource Maps! Found as loot on mobs and in chests, you can discover resource maps for lumber, ore, skins, and fish. They must be deciphered in the same manner as with Treasure Maps, with a Cartographer. Their skill, coupled with the quality of Spyglass they use, will yield a map of varying degree of accuracy. Your individual Gathering skill (lumberjack, mining, fishing, forensics) will determine how close you need to be to the actual gathering spot in order to find it. (Note: Fishing Resource maps will always be land-based, you will not need a boat).

resource maps.PNG


Here is how my first Lumber Resource map went: Dullwood!

After decoding, the map pointed me to the quiet little settlement in the Rolling Hills of Andaria, and honestly was very close to where the actual harvesting location was to be found. :)

dullwood1.PNG
lumbermap1.PNG


If you are "close enough" to the actual spot, you will set up a camp. Just use your harvesting tool (in this case, my hatchet), and you will then be presented with an arrow pointing to the "real deal!"

arrow.PNG


arrow2.PNG


Once you begin gathering, you will be notified of how much more of the resource is available. Just keep harvesting until the area is exhausted.

dullwood gather1.PNG


Amounts will vary, but I got a pretty good haul; 91 Dullwood Logs!

dullwood gather final.PNG


And finally, don't forget to pack up your camp before you leave (it's just a courtesy really). Double-clicking on the camp will pack it away. Happy Harvesting! :D

pack it up.gif
 
Resource Maps, An Addendum!

Here is some info on the other types of resources, and what to expect. They all essentially work the same way: get close to the area, use the appropriate harvesting tool, follow the arrow, and harvest until the map is dry!

Ore (Mining):

ore.gif


oremap1.PNG


Skin (Forensics), received 75 Dullhide:

skin1.gif


skin2.gif


Fishing (...Fishing), received 23 raw large fish, 15 raw crab, and 13 raw lobster:

fishingmap.PNG


fish2.PNG


Annnnd, there you go. Resource maps :)